
A Neoclassical Recreation for a One of a Kind Doll

A practice-led historical recreation project by Seneca Fashion Resource Centre student researcher Mara Buda.
The purpose of this research project is for the fashion history student to experience and learn fashion history through the doing. Fashion is a fundamentally tactile and maker-driven medium, garments are designed, fabricated and then worn on an individual body. Thus, the many modifications to the body that are introduced through garments are very valuable to observe. Also, the cutting, sewing, and shaping can have profound effects on conduct, and physical mobility of the wearer.
Keeping this in mind, the student will present a proposal for a historical garment that they will re-make. If the proposal is accepted. This will be accepted in lieu of the final essay for Fashion History FSH200 subject, and will be accompanied by an 800 to 1,000 word written description. This research should reference the historical recreation texts Patterns of Fashion 1-5 by Janet Arnold from the course lectures:
As well as the scholarship of Australian researcher Hillary Davidson “The Embodied Turn: Making and Remaking Dress as an Academic Practice” (2019):
https://www.tandfonline.com/doi/abs/10.1080/1362704X.2019.1603859
The process will be fully documented through clear photographs tracing the research and evolution of the garment. Students will be evaluated on historical accuracy, research into the garment shape and fit; pattern making of the garment as well as final photographic presentation of the finished historical garment.
Mara Buda describes her historical recreation as follows:
When it came to choosing the item I wanted to recreate for this project, I decided on the Neoclassical period as I love the general simplicity of the style of that era. That’s not to say that creating garments in the late 18th / early 19th century was easy, quite the contrary. By recreating one myself, I can attest to the labour and attention to details that went into constructing the garments as well as the time that went into it, especially since the sewing machine had not yet been invented.
I was initially inspired by the looks created for the Bridgerton TV show on Netflix that is set in the late 18th/early 19th century and references neoclassical dress styles. It led me to research and recreate a typical garment of the era: a French style dress dated around 1804-1814 made out of cotton that is part of a collection owned by the MET Museum in New York (fig. 1).
This particular garment is a French dress from around 1804-1814, created out of cotton, designer not stated. While researching the fabrics and trims used, I realized that finding the exact ones in order to recreate in quarter scale would be difficult, so I chose to substitute the dress fabric with several layers of tulle to still give it a similar look to the original. For the chemise I chose a thin cotton so as not to add bulk and still keep the same feeling of daintiness of the era. Given that I could not find similar trims small enough so they wouldn’t look oversized, I chose to change them, but still wanted to keep the nature motif.
One of the other reasons I chose this particular dress was the additional photos of detailing that other garments lacked. At most, I was able to find front and semi side views of items from early 19th century. In order to accurately recreate an item, additional angles of it are helpful. Even better if the garment can be viewed in person.
As mentioned previously, trims like the ones depicted in these photos have been close to impossible to find. In order to accurately recreate them, they would have to either be embroidered by hand or have them custom made. Given the intricacy of the designs, they would take at least several months if done by hand. The motifs depicted seem to portray cattails, which were considered to be the equivalent to an olive branch and signified peace. They were also known to symbolize new beginnings (Symbols and Synchronicity, 2021), which leads me to believe that this dress, while not officially stated, could be a wedding dress (new beginnings in a relationship).
I started by studying the photos I had, making note of all the details I could see, since I did not have access to the physical garment. This included:
- Main dress made out of semi sheer fabric with decorated train
- Chemise out of soft cotton
- Low cut décolleté
- Same trim around the neckline, waistline, sleeve hems and edge of train
- Gathered and slightly puffed at the back
What I ended up changing was: - The trim used
- Lace detailing added instead of trim
- The way the garment was constructed due to the scale I was creating it for
The next step was adjusting my blocks to fit the doll I was using for this garment. She’s 38cm/15in tall with a flatter chest, which worked great for this type of garment as the preferred body type of the era was slim and less curvy
Neoclassical Fashion in Miniature

I originally prepared bodice and skirt blocks, but realized that the torso blocks would work better for this project instead, so I adjusted the torso blocks to fit. First, I traced out my blocks on paper and added an additional 8″ in order to make it floor length. This applied to both the chemise and dress.
The next step was to create the bodice. To do that, I first lowered the neckline at the front by ¾” and gave it a soft square shape. I then moved the side seam dart to the centre dart in order to create a fitted shape and then calculated where my new waistline would be. I did the same for the back of the bodice, but instead of a square-like neckline, I gave it more of a rounded shape and not as low cut as the front.
When you think of Neoclassical/Regency fashion, what stands out the most is the apparent simplicity of the style and perceived freedom of movement the garments gave the wearer. However, many people nowadays do not realize that a lot of work, time and skill went into creating such clothing and that the women in the early 19th century wore other layers underneath the main dress, such as a corset, chemise and petticoats (optional) in order to achieve the fashionable look of the era inspired by Greek/Roman statues (Lowell, n.d.). This was also during a time before the sewing machine was invented, which means that all the garments were entirely hand sewn and took a long time to create.

Fig. 1. French dress
While researching what fabrics and trims were used, I realized that an identical recreation would be difficult as the materials used either do not exist on the current market or would have to be custom ordered. I chose to substitute the fabrics for what was available to me at the time: several layers of tulle for the main dress instead of what seemed to be cotton gauze, and lightweight broadcloth for the chemise in order to give it the dainty and ethereal look of the era. Finding similar trims proved to be a challenge as well, so this was another change that was needed: I wanted to keep the nature motif, so I used trims that would not look oversized, seeing as this would be recreated in quarter scale.
As with many other fashion styles, there are numerous symbolic elements used throughout history to show one’s social status and beliefs through the garments they wore. This dress is no different as the motifs depicted seemingly portray cattails, which were correlated to olive branches and signified peace. This motif also symbolizes new beginnings (Symbols and Synchronicity, 2021), which, although not officially stated, could represent new beginnings in a relationship (marriage), and leads me to believe it may be a wedding dress.

Fig. 2. Collar trim

Fig. 3. Dress trim (centre front)
Some of the research included studying the photos available and taking note of all the elements and details I could make out, such as what type of fabrics were used, the style (empire waist with low cut décolleté), what trim was used and where, and any other design features. Since I was recreating this garment in quarter scale, I ended up changing the trim that was used, I added lace detailing with floral motif on the front of the dress instead of cattail inspired trim, and had to incorporate modern sewing techniques in order to achieve a clean finish.
Some modifications were needed in terms of construction as well. Generally, the chemise was considered an undergarment to be worn as the first layer and it was adjustable around the neckline. However, for this particular project I chose to make it fitted as there was no corset that would go on top and help with the added bulk. Due to the nature of the tulle used for the main dress, no petticoats were used either as the dress is able to hold more of its shape, especially since it was created in a smaller scale.
For this garment, I created the pattern, then did a muslin fitting to see what changes were needed, then made the adjustments accordingly before sewing the final garment.
The first step was to create the pattern. I used the ¼ scale torso block and marked where I wanted the new waistline to be, lowered the neckline by 1” at the back and 1 3/8” at the front and widened it by removing 5/8” at the shoulder on each side. I used the same block to create the dress and chemise, with several modifications for each. Once I was happy with the initial proportions, I cut the blocks at the new waistline to create the bodice and skirt.

Fig. 4. Torso block trace off
To create a tighter fit, I closed the darts and made the dress bodice 1/8” bigger than the chemise bodice at the neckline and sleeve hole as I wanted it to cover the garment underneath when layered.

Fig. 5. Bodice pattern draft
For the lower part of the chemise I added extra length that measured 14 ½” from the new waistline, then flared it 1” out at the hem. As the silhouette has a columnal shape, I added 1/8” at the original waistline to give the chemise a less contoured look.

Fig. 6. Chemise skirt pattern draft
The next step was creating the sleeves for the chemise and the dress. As with the bodice patterns, I made the dress sleeves 1/8” longer at the hem before using the slash and spread method to create them. I cut 6 panels for the chemise sleeve to add some volume without adding too much bulk, then cut them and spread them out in a way that would give it the desired shape and size. The cuff for this sleeve is ¼” wide.

Fig. 7. Chemise sleeve draft
Following the same steps as for the chemise sleeve, I created the one for the dress, with the difference being that I cut 8 panels with added length to add more volume. The cuff for this sleeve is ¼” wider to accommodate the chemise sleeve underneath.

Fig. 8. Dress sleeve draft
In order to construct the bottom part of the dress (the skirt), I draped muslin fabric on the ¼ scale Judy (what dressforms are called) first before making the pattern. I roughly marked where I wanted each pattern piece to go directly on the muslin, gathering and pinning the fabric where needed before cutting off the excess.

Fig. 9. Muslin draped on Judy
Fig. 10. Shaping the dress on the Judy

Fig. 11. Back view of skirt draping
Once I was satisfied with how it looked, I unpinned the muslin from the Judy and cut out the pieces I needed to create the patterns with, adding notches where necessary.

Fig. 12. Marked muslin laid out flat

Fig. 13. Muslin placed on marker paper with notches marked
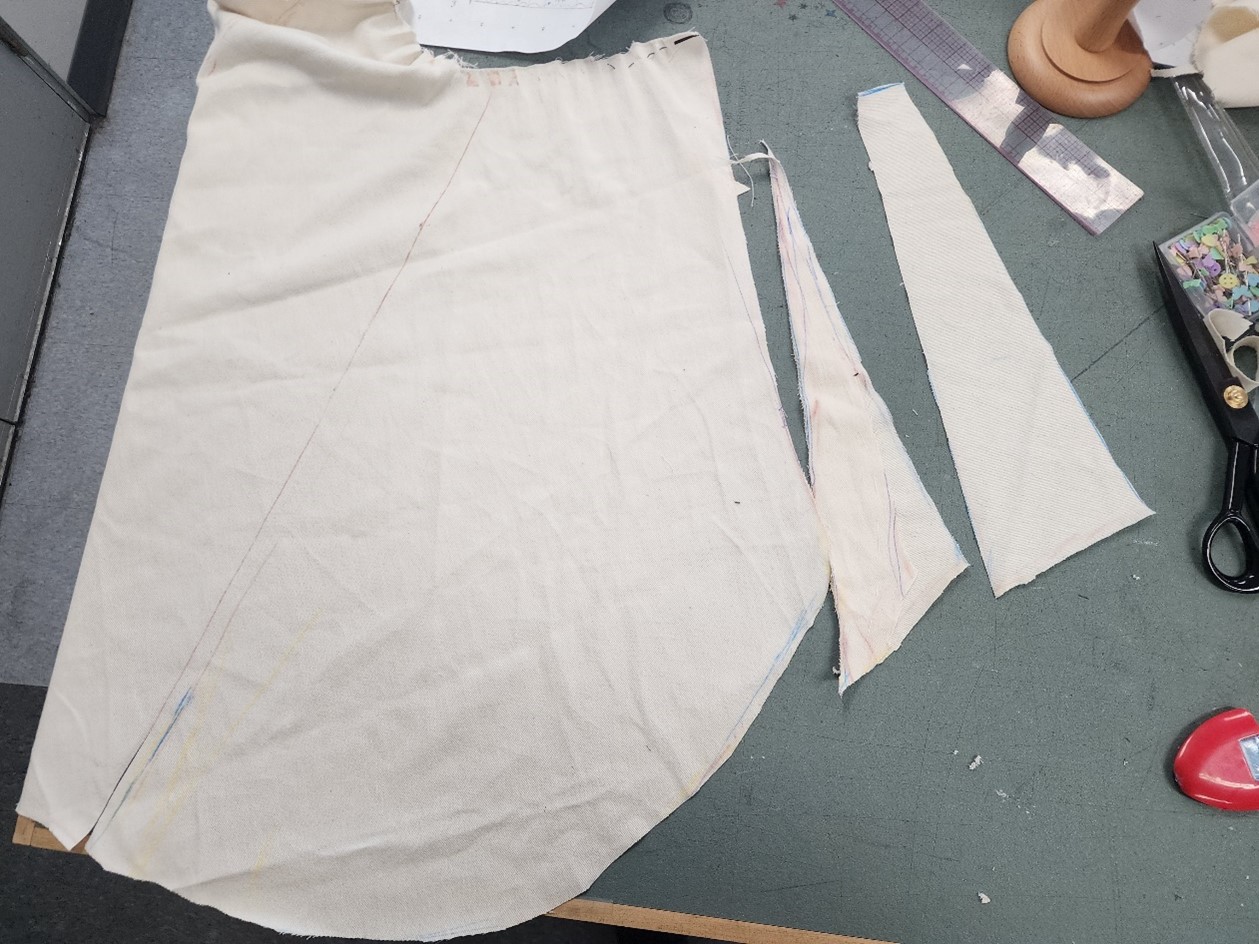
Fig. 14. Muslin pieces cut and prepared to be transferred onto marker paper
I laid down the muslin pieces on marker paper and traced them out, then smoothed out the lines and made sure that all the notches matched.

Fig. 15. Dress skirt pattern draft
With the pattern draft done, I transferred the pieces onto tracing paper, then placed them on muslin to prepare both garments for the fitting.

Fig. 16. Pattern pieces laid out on muslin for fitting

Fig. 17. Chemise bodice and skirt sewn for fitting

Fig. 18. Front view of dress skirt muslin fitting

Fig. 19. Side view of dress skirt muslin fitting
Since both bodices used the same pattern with minor differences, I sewed only the chemise bodice as I knew that if this one fit well, the dress bodice would definitely fit as it was a slightly larger size. At this step I marked any changes I needed to make directly on the muslin and also decided to create a facing for the chemise bodice for a cleaner finish.
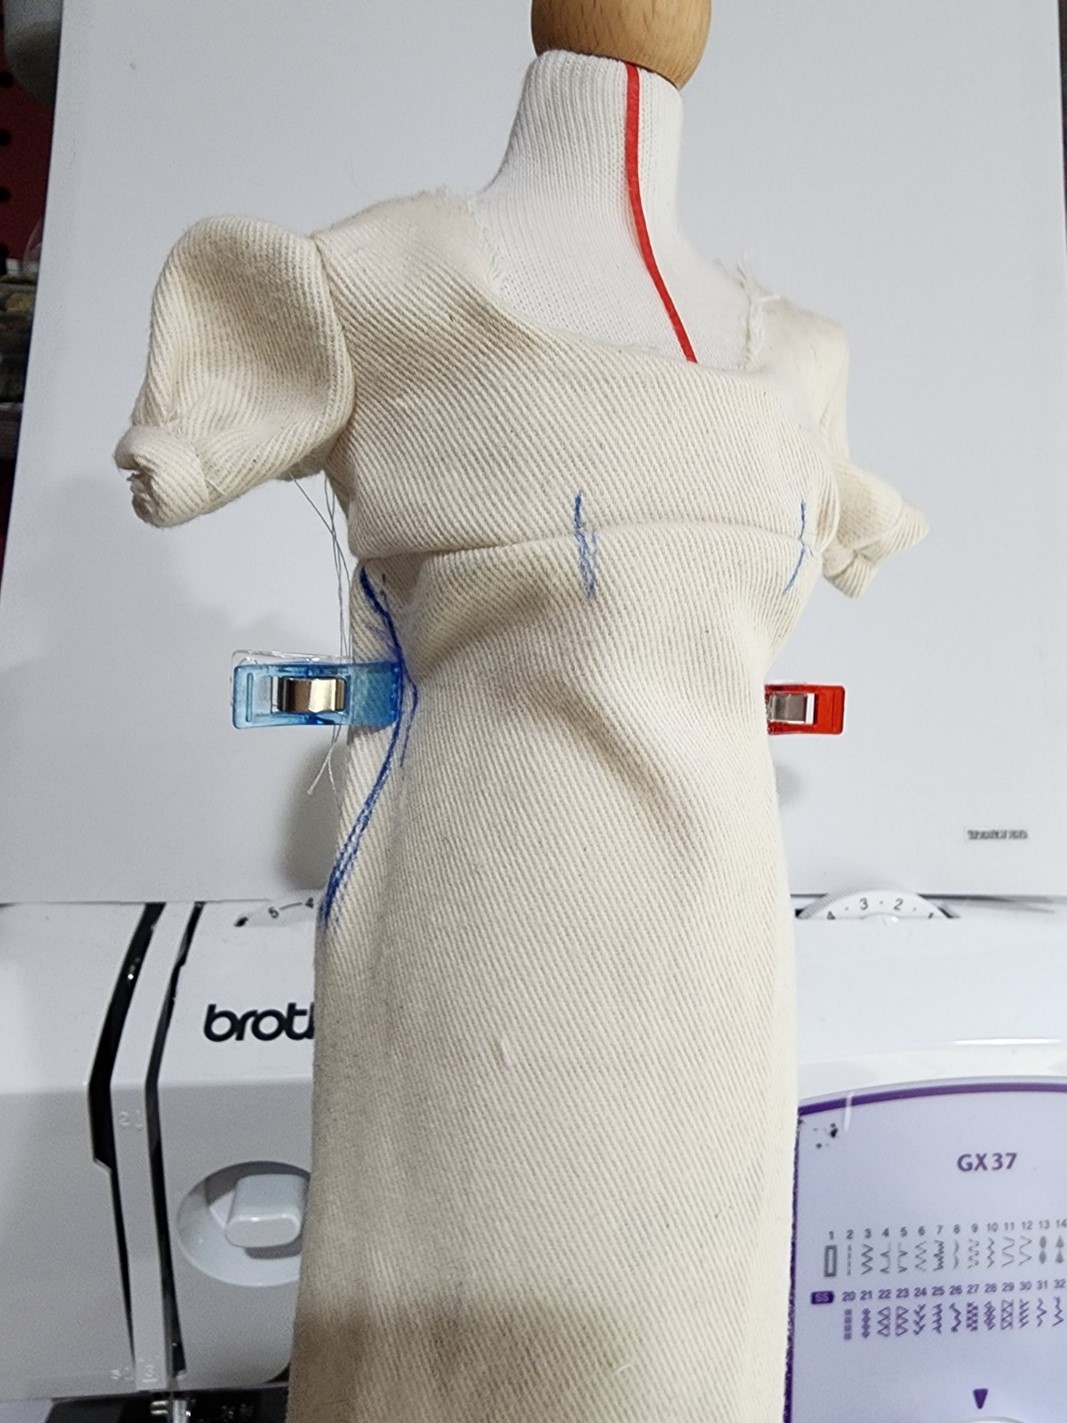
Fig. 20. Marked muslin chemise
After recording all the changes and making the necessary modifications to the patterns, I once again traced them out and this time placed them on the chosen fabrics in order to start sewing the final garment.

Fig. 21. Chemise pattern pieces placed on broadcloth

Fig. 22. Dress pattern pieces placed on tulle (four layers each)
The next step was cutting the fabric pieces and then sewing them all together. As mentioned previously, I chose to use broadcloth for the chemise in ivory as a nod to the inspiration dress. To give the garment a higher end feel, I used French seams to finish, even though this technique wasn’t invented until roughly the 1860s (Roberts, 2015). Up until that point, many dressmakers either left the inside seams raw or they used some antiquated techniques to clean finish garments (Stowell, 2017). Even though the chemise is fitted, I thought adding ribbons at the back as closure would give it a slightly more authentic look as undergarments had ties that would help tighten them.

Fig. 23. Chemise bodice on Judy

Fig. 24. Dress bodice over finished chemise

Fig. 25. Front view of dress skirt over chemise

Fig. 26. Back view of dress skirt over chemise
Before sewing the dress bodice and skirt together, I added the trim around the neckline and played around with the lace embellishments for the skirt to find the best placements as it was easier to do so at this stage.

Fig. 27. Sewn dress bodice on Judy

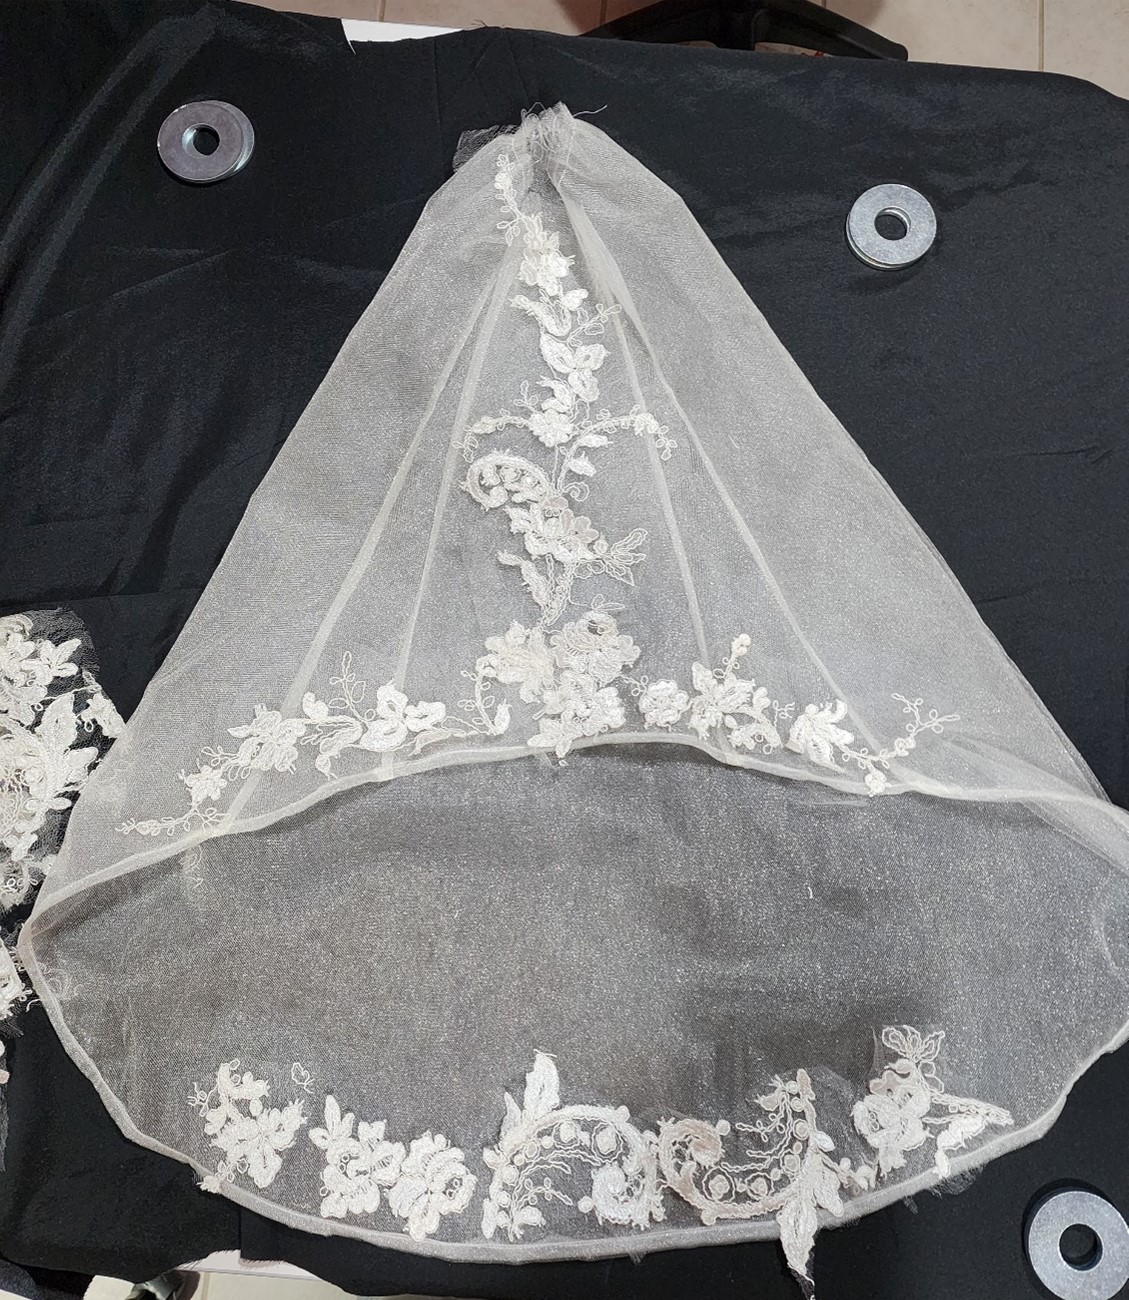
Fig. 28. Lace detailing placement on dress
The next step was to sew the dress bodice and skirt together and add the trim to the higher waist and hem. Finally, I hand-stitched the lace details on the dress and added a hook and eye closure at the back.
Fig. 29. Front view of dress embellishments

Fig. 30. Lace details on bottom of dress

Fig. 31. Back view of lace details on bottom of dress

Fig. 32. Back details on dress bodice
Now that the dress is finally finished, I wanted to do a side by side comparison with the inspiration dress from the MET Museum. Given the fact that there are only a few photos posted online of this garment and very little information provided, there was some guessing involved in trying to figure out how this particular dress was created and what materials were used.

Fig. 33. Front view of French dress

Fig. 34. Front view of recreated dress

Fig. 35. Back view of French dress

Fig. 36. Back view of recreated dress

Fig. 37. Side view of French dress

Fig, 38. Side view of recreated dress
In creating doll clothing, construction and patternmaking rules need to be broken at times in order to achieve the desired look. Generally speaking, most fashion dolls nowadays do not have human body proportions, so patterns cannot always be scaled down from regular ones. Due to this, additional work may be involved in creating blocks and patterns in various sizes for all the dolls out there.
Even though it may seem intimidating at first, designing and sewing in miniature can prove to be a fun challenge for those who are willing to give it a try!
Doll Culture
Excellent work Mara!
The process of creating historical recreation in miniature, aligns with a long tradition of representing fashion on a smaller scale. Seneca Fashion Resource Centre coordinator (emeritus) professor Dale Peers has written about doll culture for the SFRC here:

References:
Lowell, L. (Unknown). Neoclassical (English Regency/French Directoire). Lowell Designs. Accessed December 12, 2022 from https://lowelldesigns.com/neoclassical/
Roberts, M. (2015, March 28). It seams French. Two Threads Back. Accessed December 14, 2022 from https://twothreadsback.com/2015/03/28/it-seams-french/
Stowell, L. (2017, April 19). Guts – Inspecting the Insides of 18th Century Garments. American Duchess. Accessed December 14, 2022 from https://blog.americanduchess.com/2017/04/guts-inspecting-insides-of-18th-century.html
Symbols and Synchronicity. (2021, July 5). Cattails – traditions, symbols, spiritualism. Symbols and Synchronicity. Accessed December 12, 2022 from https://symbolsandsynchronicity.com/cattails-bulrushes-spiritual-symbolism-meaning/#:~:text=The%20most%20common%20association%20with,an%20end%20to%20any%20conflict
Images:
Fig. 1-3, 33, 35, 37. Met Museum (n.d.). French Dress. The Met. Accessed on December 17, 2022 from https://www.metmuseum.org/art/collection/search/83189
Fig. 4-32, 34, 36, 38. Buda, M. (2022). Process photos of patternmaking and sewing.